Friday, September 30, 2011

CSAYL - Resist The Temptation


Okay, time for another Christmas challenge over at CSAYL and this week is a tough one. Create a card or project with absolutely no stamping!! The challenge is sponsored by A Perfect Presentation and the winner receives a free template of their choice:

View Perfect P...bmp in slide show

The good thing about this for me as it forced me to reach into my stash of rubons and ribbon that I rarely use now and I am happy with the result even though I missed my trusty stamps!


I worked again with the Uptown Takeout template, printing it onto Kraft cardstock. I used some Cristina Re papers to decorate and some pink ribbon from my stash to tie around the box. I used an old Christmas rubon with some white cardstock and then cut it with my 1 1/4" circle punch. I matted this on a Bashful Blue piece punched with my Scallop Circle punch. The edge of the scallop was blinged up with some blue rhinestones and then this was all added to the front of the box with dimensionals.

I punched two small holes through the top with my Crop A Dile and tied more pink ribbon through to hold it together. I used another rubon for my tag with white cardstock and then handcut this out and punched a tiny hole. Some twine was thread through  and around the pink ribbon.

Not your usual Christmas colours but I really loved the pinks and Kraft together and guess the bling makes it look a little more Christmassy.

 Now hop on over to the CSAYL blog to see the rest of the girls' creations and link up your entry for a chance to win!! Only 8 more Christmas challenges to go!!


Supplies
Cardstock: Kraft, Select White (PTI);Bashful Blue (SU); Cristina Re DP
Accessories: Uptown Takeout PDF template (A Perfect Presentation); blue rhinestones (Kaisercraft); pink ribbon; cropadile; dimensionals, 1 1/4" circle punch, Scallop circle punch (SU); rubons (stash); twine (AnnaBelle Stamps)

Wednesday, September 28, 2011

CR84FN39 Challenge


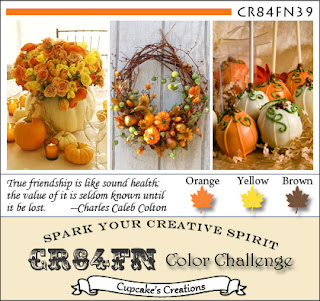
My eldest son Rohan had a birthday to attend for one of his best friends who just turned 10. I knew I wanted to use my new number dies from Papertrey Ink and decided that the colour combo over at CR84FN this fortnight was just perfect:


I have listed the steps to make my card below:
1. Cut card base from Stampers's Select White 11" x 4 1/4 " and score in half.
2. Cut a piece of Pumpkin Pie card 5 3/8" x 4 1/8" and adhere to card front.
3. Cut a piece of white card 51/4" x 4" and adhere.
4. Cut 1 strip each of Chocolate Chip, Pumpkin Pie and Lemon Zest card 4" x 1/4" and adhere across card front.
5. Die cut numbers from a piece of white card  and score 2 lines underneath the numbers using Scor Pal.
6. Cut a piece of Pumpkin Pie cardstock 1/4" larger than white die cut piece and adhere some Chocolate polka dot paper on top.
7. Mount the die cut number panel on top with dimensionals.
8. Stamp HB2U from Boy Basics: Game On in Chocolate Chip ink on a white banner and adhere under the score lines. Adhere yellow buttons on either end.
9. Attach the focal layers to card base.


On the inside I simply stamped my sentiment on a white layer using Boy Basics: Game On in Chocolate Chip ink. On the bottom I added strips of Pumpkin Pie, Chocolate Chip and Lemon Zest cardstock.

There you have it - these By the Numbers Dies are fantastic and I can see endless possibilities to use these!!

Supplies
Stamps: Boy Basics: Game On (PTI)
Cardstock: Stampers Select White, Lemon Zest (PTI); Chocolate Chip, Pumpkin Pie (SU); Polka Dot DP
Ink: Chocolate Chip (SU)
Accessories: By the Numbers die set, Lemon Zest buttons (PTI); Scor Pal; Glossy Accents; dimensionals

Friday, September 23, 2011

CSAYL - Clean and Simple


It's the end of the week, so its time for another CSAYL challenge - to create a clean and simple card. This is not an easy task for me as I am always tempted to add something extra each time. But that's what's great about challenges right?

View Karber Im...jpg in slide show

This week's challenge is sponsored by Karber Digital Images and the winner of this week's challenge will receive two free digis. The image that the team is working with this week is Rudolph.


My card looks clean and simple but I just had to go the extra mile. I couldn't help myself - I did some masking and reverse masking.

I first used some scrap cardstock and die cut a circle from it using my largest circle nestability. Then I stamped my Rudolph image in the centre of my main layer and again on another piece of scrap cardstock. I covered my main layer with my diecut scrap and also adhered my scrap Rudolph image over the top of my main image. I used a sentiment stamp to repeatedly stamp my sentiments around my Rudolph image in Kraft ink. When I took away the die cut scrap and the Rudolph mask, I ended up with a circle of sentiments around my image. Finally I coloured Rudolph in with my Copics. 

I stamped my sentiment from Holiday Button Bits in Real Red ink and ran my main layer through my Cuttlebug with my trusty Linen Impression plate. Some Chocolate bakers twine was tied around my  main layer a couple of times and then the layer was adhered to my base. To finish off Rudloph I added some Glossy Accents to his nose for some shine.


On the inside I kept it very simple using the full sentiment stamp for my message:


Now its your turn! Link up your creation to the CSAYL blog for your chance to win this week's prize and check out the rest of the team's cards. I am off to check them out now!

Supplies
Stamps: Rudolph digi (Karber Digital Images); Holiday Button Bits (PTI); Christmas sentiment stamp (unknown)
Cardstock: Stampers Select White (PTI)
Ink: Real Red, Kraft (SU)
Accessories: Circle nestabilility (Spellbinders); Linen impression plate (PTI); Glossy Accents (Ranger); Copics; Chocolate bakers twine (MFT)

Thursday, September 22, 2011

DT Call!!

Hi,
Just a quick note to let you know that over at Colour Create they are having a Design Team call! If you are interested, all the details are explained over at the blog. I personally love the fortnightly colour challenge - pushes me out of my comfort zone and I have heaps of fun along the way!

Colour Create Challenge #80


Hello!
Today its Colour Create challenge time and Sharon has come up with a fab colour scheme - Lime Green, Aqua and White (with the optional extra challenge of adding a butterfly).

22 Sept - Challenge 80 - Sharon L Lime Aqua & White

As soon as I saw this colour combo, I knew what stamp set I wanted to use - Hanging Out by Papertrey Ink. OMG - this is my favourite stamp set at the moment! I had so much fun stamping and cutting out my little clothes (but I do  need to get the matching dies to save all that time fussy cutting!!) I see endless possibilities with this stamp set! Anyway, here is my take on the colours:


I used Tempting Turquoise as my base and then added a layer of white cardstock for  my mat. I stamped my grass along the bottom in Certainly Celery ink. I then used my small cloud die and sponged some Cyan pigment ink to create my sky. The technique for this I found here.  I definately need some practice at this but boy it was heaps of fun! The washing line was then stamped in Tuxedo Black ink as well as my sentiment. I stamped my three pieces of clothing in Tuxedo Black ink and coloured my overalls with B00/B02 Copics, adding some polka dots with my white gel pen. I stamped over the other two pieces with the solid t shirt and bib using Certainly Celery ink. Finally I lined the clouds with my Atyou Spica clear glitter pen. It was hard to get an effective photo of this, but this gives you an idea:


On the inside, I repeated the background and then stamped the sock and bib image, coloured these and fussy cut them before adhering on top of the grass. My sentiment is another from the Hanging Out set. Finally I added more glitter to the clouds with my clear Atyou spica glitter pen. After photographing and uploading my card, I realised that I forgot to add my buttefly for the challenge! Oops!


Take a look at the other inspiring creations for our fabulous design team over at Colour Create. You have two weeks to enter this challenge for a chance to win this fortnight's prize. Details can be found over at the Colour Create blog!

Supplies
Stamps: Hanging Out (PTI)
Cardstock: Select White (PTI); Tempting Turquoise (SU);
Ink: Tuxedo Black (Memento); Tempting Turquoise, Certainly Celery (SU); Cyan Versacolor Ink (Tsukineko)
Accessories: Clear Atyou Spica Glitter Pen; B00/B02 Copic markers; small cloud die (PTI)

Monday, September 19, 2011

Easel Cards

Hello,
Just here with a quick post to show a couple of cards that I made with some friends at a recent card night. I waanted to show a fun fold so I couldn't go past an easel card!


For my first card I used a fun A La Mode image  - Time To Celebrate and coloured this with my Copics. I then die cut the image with an oval nestie and matted it on an Old Olive scalloped oval die cut. The background papers are from the Sugar Plum paper pad by Papertrey Ink and these have been adhered to an Old Olive layer. Some white ribbon was tied around the middle to cover the seam and the sentiment was stamped in Real Red ink. Finally this was added to my Kraft base.


The inside of my easel card was kept very simple by stamping my sentiment on some more Sugar Plum paper, punching it out with my oval punch and matting it on some Old Olive card punched with my Scalloped oval punch. This was adhered to the card on dimensionals to ensure the easel would sit correctly.


My next card follows exactly the same layout except I decided to work with a Pure Innocence image - Being Cute Is What I Do. I used Plum Pudding cardstock for my mats and stamped my sentiment in Old Olive ink. For this one I also decided to paper piece the top using some more Sugar Plum paper.


Excuse the blurry image of the inside! We had heaps of fun making these cards - I will be making more of these for sure!

Supplies
Stamps: Pure Innocence- Being Cute Is What I Do; A La Modes - Time to Celebrate (MFT)
Cardstock: Kraft, Perfect Plum, Select White, Sugar Plum Paper Pad (PYI); Old Olive (SU)
Ink: Real Red, Old Olive (SU); Tuxedo Black (Memento)
Accessories: dimensionals, white satin ribbon, Scalloped Oval nesties, Oval nesties (Spellbinders); Scalloped Oval punch, Oval punch (SU); Copics

Friday, September 16, 2011

CSAYL - Inspiration Photo

Hello!
Last day of our school term - hip hip hooray!!! This term has felt like a particularly long one, so a two week break is well deserved I think. I don't plan to do too much - just catch up with a few friends, clean the house and relax!!!

This week for our CSAYL challenge, we have a new fabulous sponsor - Bugaboo Stamps:

View bugaboo s...jpg in slide show
They have a wonderful range of digi stamps for every occasion and you can check out their site here. There will also be two winners chosen this week - one winner will receive a $21 gift certificate to spend over at Bugaboo Stamps and the other winner will have the chance to be a guest designer for us in October. Also this week, the Bugaboo DT are going to join in with our challenge! You can check out their blog here. I chose to work with the Ava and Deacon Christmas - Ho Ho image. For this week's challenge we have a photo to inspire us:


The gorgeous red and green were the first things to catch  my eye so I used this as my colour inspiration for my card.


 I first printed the image onto some white cardstock and also on to my designer papers. I then cut out the letters and hats from my DP and paper pieced them onto my main image. The rest of the image was coloured with copics and some sparkly fluff added . I added another strip of the green paper to one side along with some red striped ribbon. Finally I rounded the corners of the white layer and mounted it on to my white base. The front was finished off by adding some pale green rhinestones.

The inside was kept very simple by stamping my sentiment in Tuxedo Black ink and matting my white layer on some more of the Happy Day paper.

So double the reason to enter this week's challenge - be sure to link up your creation over at the CSAYL blog before next Thursday and while there, check out the team's cards for some more inspiration!


Supplies
Stamps: Ava and Deacon Christmas - Ho Ho digi (Bugaboo Stamps); Holiday Button Bits (PTI)
Cardstock: Select White (PTI); Happy Day DP (SEI); green DP (unknown)
Ink: Tuxedo Black (Memento)
Accessories: Sparkly Fluff (TE); rhinestones (Kaisercraft); red ribbon (AnnaBelle Stamps); corner rounder punch

Friday, September 9, 2011

CSAYL - Teacher's Pet

Over at CSAYL this week, the challenge is to create a card for a teacher. The winner of this week's challenge will win the chance to be a guest designer for one of our future challenges. Here is my card:


I went with a CAS card this week using a cute stocking image from my Tiny Treats: Christmas set which I coloured with copics. These were punched out with 1 1/4 " circle punch. I didn't have a teacher stamp so I printed my sentiment from the computer and drew a frame around for a border. Finally I embossed this layer with my linen impression plate before layering on some Real Red cardstock and adhering to  my Kraft base.

On the inside I used another computer generated sentiment to match the fonts and stamped the snowflake image from Tiny Treats and coloured with a copic marker. I added another frame, embossed with my linen impression plate and matted the layer on some Real Red cardstock.

Check out the other ladies' gorgeous projects over at the CSAYL blog and don't forget Christmas is creeping up so why not link up your creation too!


Supplies
Stamps: Tiny Treats: Christmas (PTI)
Cardstock: Kraft, White (PTI); Real Red (SU)
Ink: Tuxedo Black (Memento)
Accessories: Linen impression plate (PTI); 1 1/4" circle punch (SU); copics; dimensionals, black pen

Thursday, September 8, 2011

Colour Create Challenge #79

Hi there,
Another fortnight has passed so its time for another challenge for Colour Create. This week the challenge is to use these gorgeous colours picked by Sylvia - pink, brown and cream/white. Here is the inspiration pic
 8 Sept - Challenge  79 - Sylvia
The optional extra is to add lace to your project. Here is my take on the challenge:


I chose to go with a Christmas theme this time and used some Rustic Cream cardstock for my card front. I embossed my Peace sentiment from Snowflake Serenade and randomly stamped some Blush Blossom snowflakes from the same set in the corner. I added some bling by using some pink rhinestones on my sentiment and also adding a strip of adhesive with some glitter sprinkled on top. This layer was then tucked in behind my brown and pink scalloped strips and some Very Vanilla ribbon added.


I stamped another sentiment from Snowflake Serenade inside with Chocolate Chip ink and clear embossed this. A row of pink snowflakes was stamped along the bottom.

The winner of this week's challenge will receive a gift voucher from Michelle's Scrapbooking:

So head on over to the Colour Create blog and check out the rest of the team's designs and link up your creation for your chance to win!

Supplies
Stamps: Snowflake Serenade (PTI)
Cardstock: Rustic Cream, Sweet Blush (PTI); Chocolate Chip (SU)
Ink: Chocolate Chip, Blush Blossom, Versamark (SU)
Accessories: Apron Lace border punch (Fiskars); Dazzling Diamonds glitter, clear embossing powder, Very Vanilla ribbon (SU); pink rhinestones (Kaisercraft); corner rounder

Friday, September 2, 2011

CSAYL - Fancy Shmancy


Hi there,
Another week has passed so its time for another weekly CSAYL challenge. The challenge this week is to create a card with a fancy fold. Our fabulous sponsor this week is Pink Cat Studio:

View PCS_Spons...jpg in slide show

Pink Cat Studio have a huge range of both digi and rubber stamps for every occasion and they are so much fun to work with! The winner of this week's challenge will receive 5 free digis of their choice.

I haven't made many cards with fancy folds, so I decided to go with one that I do love making which is an easel card. For this card I chose to work with Snowflake Fairy Lily.

I used Kraft for my base and then two designs from Papertrey's Sugar Plum DP which were matted on some Plum Pudding cardstock. The join was covered with some Fresh Snow ribbon. I printed my Lili image onto some white cardstock and then die cut it with a circle nestie. The image was coloured with copics and I printed the snowflake a second time, popping it up on dimensionals. Some glitter was added as well to the image along with some Glossy Accents to the wings.


My circle was matted on a Dizzy Doily die cut from Plum Pudding cardstock. I stamped the Let It Snow sentiment in Real Red ink at the bottom of my card and added some silver rhinestones beside it.

On the inside I stamped a small snowflake image in Bashful Blue ink and my sentiment from PTI's Holiday Button Bits was stamped in Real Red ink on some more Sugar Plum DP, and matted on a Plum Pudding Scalloped Oval.

This week we have a fabulous guest designer with us - Julie. Be sure to check out her blog to see her lovely creations. Make sure you also hop on over to the CSAYL blog to see the rest of the design team's fancy fold cards!

Supplies
Stamps: Snowflake Fairy Lily (PCS); Holiday Button Bits (PTI)
Cardstock: Kraft, Select White, Plum Pudding, SugarPlum DP (PTI)
Ink: Real Red, Bashful Blue (SU)
Accessories: Dizzy Doily die (MFT); Circle nestability (Spellbinders); Fresh Snow ribbon (PTI); Scallop Oval punch, Oval punch (SU); silver rhinestones (Kaisercraft); Copics; dimensionals; Glossy Accents (Ranger)